Photography thanks to Gayle Wilhelmi
Keith Wilhelmi's
Self-Paced Frog Dissection Guide
This guide is the product of many years of refinement during my 42.5 years of teaching the life sciences. I am confident you will find it useful, either at the middle school or introductory high school level. It allows you to put the students in charge of most of their learning - while you enjoy supporting individuals.
I use this activity at the end of our study of human biology. Comparing and contrasting the frog and the human reinforces learning. It is helpful to have a few illustrations or posters of the human body (particularly the muscles, the heart, and the brain) available for comparison. A poster or handout of frog metamorphosis might also be useful.
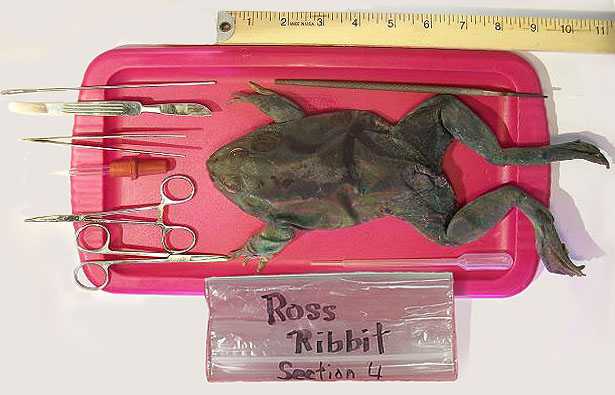
Materials
I recommend the following materials per team:
-1 bullfrog (It is worth it to purchase the largest size available, 6-7".)
-1 gallon-sized resealable plastic bag (for overnight storage of frogs)
-1 permanent marker for labeling the plastic bag
-1 tray (I use the plastic lids from shoe storage containers. I do not recommend wax-filled trays; these are difficult to manipulate and time consuming to maintain. Dissection needles are unnecessary.)
-1 glass eye dropper with a smooth end (Be careful when purchasing these; some are sold with the ends snapped off instead of melted. The smooth end is useful for expanding the glottis during lung inflation.)
-1 plastic eye dropper with a large squeeze bulb (The large bulb facilitates easier, fuller lung inflation.)
-1 metal probe (These sell for about $1.20, are rounded at the 'pointed' end and flat at the other end. Unfolded jumbo paper clips with sanded ends would serve the purpose.)
-1 pair of reasonably good dissecting scissors (It is worth it to buy the 'good,' rather than 'student' grade.)
-1 pair of large (6" or larger) dissecting scissors (These are not vital, but make some of the cutting easier for less skilled young people.)
-1 scalpel (The student grade is fine if they are kept sharp.)
-1 sharpening stone.
-1 pair of forceps (student grade is fine)
-1 clamp (These are not vital, but they make removing the skin easier. I was able to obtain unused hemostats from a local hospital.)
-1 inexpensive file (These are not vital, but are useful for shaving the skull to expose the brain. Chain saw files cost about $2.25)
-1 metric ruler
-1 pair of disposable gloves per person per day (The type worn by food service employees are very inexpensive when ordered in bulk online. Many students will more willingly participate if these are provided. An option is to have students provide their own (more expensive) disposable gloves which are available at grocery stores.)
-goggles (I have students use these in order to eliminate the very small chance of a problem during gall bladder or eye dissection.)
-magnification with hand lenses or stereoscope(s) (These add a little excitement, but are not vital. If stereoscopes are available, each team will need a plastic Petri dish side or a similar 'tray' for transporting organs and manipulating them while focusing.)
-access to refrigeration of frogs (The preservative should 'hold' for the span of the dissection, but I like to refrigerate between labs to eliminate any chance of premature spoilage.)
Some suggestions regarding logistics:
Students could work in teams of 3 or 4, but if the resources are available I strongly prefer having students work in pairs. At least one member of each team must be willing to do the dissecting. If a few students are opposed to participating, I tell them that they may simply observe or even sit with their eyes closed and listen to the instructions and the comments of their partner(s).
Allowing teams to truly work at a pace that they find productive is vital. I inform students that those who work as expected will earn some form of credit, while those who need reminders to stay on task will forfeit credit. Of course, if students know that you plan to have a separate "frog dissection test," a higher percentage of them may stay on task. However, in recent years I’ve found that my students get so "into" this dissection that I have opted not to give such a test; instead, I feel the unit helps prepare them for the human body test. I include a statement such as the following:
"You are expected to put forth a sincere effort to complete the entire dissection, and many of you will be able to do so. However, on the last day of dissecting, if it appears that you will run short on time, simply make certain that you view someone’s frog which demonstrates the structures that you have not been able to complete."
If you intend to allow students to keep the handouts, it is useful to require that they place check marks in the left margin as they complete each paragraph of instructions. This reduces the chances that they will inadvertently skip a step, and it permits you to quickly determine each team's precise status.
Prior to Day 1 - I have students indicate whether they would prefer not to be active dissectors - giving them notice that each team must have at least one active dissector. Depending upon the maturity of the group, I sometimes need to assign students to teams, but most often I am able to allow students to form their own teams (particularly since I save this unit until late in the school year).
On Day 1 - I have students sit with their teammates and we cover the "Introductory Material" as a class. This establishes the expectations and strategies for the endeavor. At some point on this day I take a break from reading the instructions and have students label the plastic bag in which they will store their frog between class periods. It is also useful to briefly introduce students to each of the dissecting tools.
Students can be permitted to move along at their own pace beginning with "Part I. Before Cutting - Note External Structures." Alternatively, you could cover Part 1 as a class, then begin the self-paced work at "Part II Dissecting Begins."
By the end of Day 2 most teams will have completed the external features (Part I), have explored the structures inside of the mouth, and have at least begun the skinning process. I often must prod some teams to remove the skin more aggressively since it’s common for students to ploddingly snip one small piece at a time. When I notice that all teams have completed the mouth, I have everyone pause and take note of illustration 1 while I explain the frog's system of breathing.
The end of Day 3 will find most teams finished with the digestive system. A few teams may be considerably beyond this point. It is useful to probe the fast moving teams to assure that they are reading thoughtfully and are carefully completing all of the steps. You will usually catch a team or two which has "skipped ahead" and needs to backtrack.
[Note: After you are convinced that all teams comprehend the comparative heart drawings, you may want to point out that the actual entrance of blood into the frog’s right atrium is closer to the center of the dorsal side of the heart - but drawing it there would have made it difficult to decipher the flow pattern.]
By the end of Day 4 a few teams will have begun the nervous system and will likely need encouragement to proceed slowly and patiently. Once they complete the brain, you may need to prod them to attempt the "If You Have More Time" suggestions listed on the final page.
On Day 5 - I usually end the activity on this day. I am very pleased if the majority of the teams complete all except the brain.
Special thanks goes to my good friend Ken Tschanz for his hours of proof reading, editing, formatting, illustration labeling -- and for designing and maintaining the web site!